
 754
754When talking about home electrical systems, one must learn how to wire a 2-way light switch which is a critical skill for any DIY person as well as homeowners. A 2-way switch gives you control by means of two points in the house and therefore offers you unique convenience and flexibility.
Well, then, let's learn how to wire a 2-way light switch and realize how they can bring in smart, energy-efficient lighting control to our living area.
A 2-way light switch is really a notable thing in both domestic and commercial spaces, enabling you to light a room from two locations. One of the widespread cases is in stairways, where you can easily turn the lights on the lowest point and off at the highest, or even the other way round.
This system also gained high popularity by places like the larger rooms with several entrances like living rooms or master bedrooms, hallway lights that are easily controlled with the help of switches being near each door. In industrial contexts, 2-way switches are used to switch off equipment or lights from different working places, consequently boosting the efficiency and safety standards.
Before the wiring work is started, it is very important to understand the difference between 1-way and 2-way switches. A 1-way switch is the easiest one, which is used to control the light only from one place.
This type of switch has two connections, one for the wire coming from the power supply and the other for the wire going to the fixture, making it perfect for simple setups, for instance, a lamp in a bedroom. On the other hand, a 2-way switch has a more complex structure with three terminals: COM (common), L1, and L2. This configuration allows the users to manage the light from two spots provided the switches are interconnected with traveler wires, usually by means of a three-core and earth cable. That is, a 2-way switch utilizes more wires and presents very flexible use, has become an ideal and in demand supporting component for larger areas, although it must be wired carefully so as not to have any problems.

One of the most frequently asked questions by newcomers is about the role of a neutral wire in a 2-way switch setup that has only two wires. In such applications, the neutral wire does not get connected to the switch, rather, it goes straight from the power source to the electric light where it hooks up to the neutral terminal to make the whole circuit complete.
The 2-way switch is mainly in charge of the place where the live (or phase) wire enters through the COM terminal. The traveler wires (L1 and L2) then connect the two switches. This configuration is such that the switch is always in the middle of the two wires; hence safety is maintained. In the event that you see just two wires at the switch, it must be verified that the neutral is fixed on the light.

Definitely, make use of a voltage tester to be sure you are not dealing with live wires and there is no danger of electricity leakage occurring when connecting power to the switches. Failing to do so may result in these hazards.
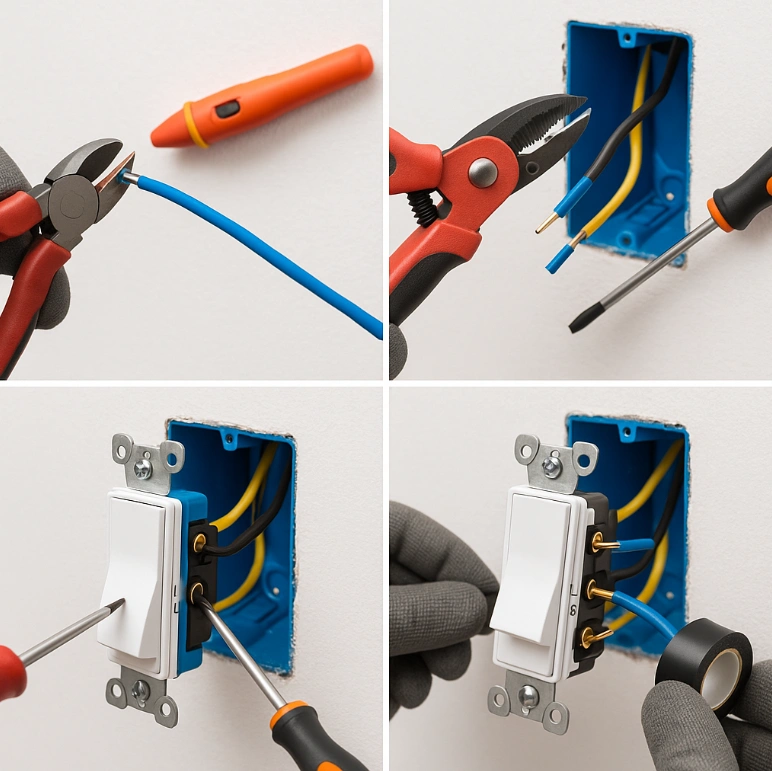
Connecting the 2-way switch to operate a light is a structured process that must observe safety regulations as well as be able to function adequately. As a follow-up, an in-depth partitioning of the whole operation will be tackled sequentially and the specific steps will be supported with clear instructions explaining how they could be accomplished successfully.
Safety First: Turn off the main circuit breaker first before you start to prevent electrical shock. Using a non-contact voltage tester to make sure the circuit is really off is a double safe option.
Gather Materials: Gather together needed tools and supplies such as two 2-way switches, a three-core cable and earth cable (e.g., 14/3 NM-B), wire strippers, a screwdriver, electrical tape, and wire nuts. Check that the voltage and amperage of all the components are in line with your circuit’s requirements.
Prepare Switch Boxes: Attach electrical boxes in both switch locations and lay them along the wall or stud with screws. The three-core cable which originates from the power source should go first to the first switch then to the second and finally to the light fixture, ensuring appropriate conduit and support.
Wire the First Switch: Wire the live wire (normally black) from the power source to the COM terminal on the first switch. The red and black traveler wires from the three-core cable shall be connected to the L1 and L2 terminals order is not critical. Tighten all connections with screws and wrap the exposed areas with electrical tape.
Wire the Second Switch: Locate the second switch to which the traveler wires (red and black) are connected from the first switch, and fasten those wires to L1 and L2. Use the black wires from the appliances and COM connectors to wire the new switch. Fix the screws on the terminals and then cover with tape.
Connect the Light: Connect the COM terminal of the second switch to the black wire that goes to the light fixtures. Make the connection between the neutral (white) wire of the power source and its counterpart on the light a direct one. Wire each box and the light with the ground (green or bare) wire to the grounding terminal, ensuring that a continuous ground path is maintained.
Test the Circuit: Switch the circuit breaker back on and perform a live test on the switches by turning them off and on. If the light turns on and off correctly from both locations, congratulations! If problems arise, then chances are that some of the connections have not been made, so please do a quick recheck and if the problem persists, call a professional.
The installation of the 2-way switch can be made from this very detailed guide. This is a significant step towards lighting-control of your home in an easy way.
When installed in a proper way, problems can still appear. What is the best way to tackle the difficulties that occur frequently?
Light Won’t Turn On: Check if you have a tripped breaker or the fuse is blown. Check all the connections for looseness or disconnection, make sure the live wire is on the COM terminal, and the traveler wires are in place.
Flickering Lights: Loose wires or incompatible bulbs (for example, dimmable LEDs with non-dimmable switches) might cause the light to flicker. So, you can eliminate the cause by fixing the connections and when necessary by changing the bulbs.
Switch Doesn’t Respond: Make sure traveler wires are not mistakenly connected to L1 and L2. Have the neutral tied to the light source (not the switch), also see if there are broken cables.
Overheating: If the switch feels too warm to the touch, the reason may be overloading of the device or its defects. A new switch of a higher power rating should be used as a replacement and make sure that the circuit’s load is not overshot at any time.
Intermittent Operation: It could seem that there is a loose neutral at the light or a broken switch. If the issue is with the switch, it can be repaired or a new one can be installed.
Regular maintenance and quick troubleshooting are the factors that make your two way switch system reliable.
It is not very difficult to find a 2-way light switch that is suitable for your requirement if you have many purchasing choices. Any local hardware store like Home Depot and Lowe's will offer help and have brands such as Leviton and Eaton, etc. Also, you can have very detailed and informative feedback about the various brands and models of the two-way light switch if you visit Amazon’s website. In addition, the official site of a professional electrical equipment manufacturer like Schneider Electric or a specialist retailer's website such as Screw fix will give you access to complete specification details besides selling top-notch switches. To have some less expensive options, the buyers can go through those budget-friendly models on Walmart, for example, or even eBay, but quality and reliability must be verified. Look for clearly designated terminal load ratings of 15A or 10A, and ensure they will properly connect to your wiring. The purchases need to be made only in the well-known stores to guarantee safety and efficiency.
The method for selecting the most suitable 2-way switch which is necessary for your project is to check the project's requirements. For the lighting load of a standard home, a 15-amp switch with one pole is the most common used configuration. However, in wet places like bathrooms, opt for weatherproof or GFCI-compatible switches, which will enhance the level of safety in the area. For intelligent home systems, it is preferred to select WI-FI enabled models from brands like TP-Link or WeMo, compatible with Alexa or Google Home. Also, have a look at the colors of the switches white, ivory, and stainless steel are the most popular finishes. You can also find the voltage ratings of the switches, such as 120V or 277V, and make sure they are compatible with your circuit. The purchase of a good and suitable switch for your needs will ensure trust and long-term dependability.
Depending on the materials and the labor, the cost of a 2-way switch installation can be within the range of the following. The price for a basic 2-wayswitch is $5–$15, where a three-core cable would be around $1–$2 per foot. The inaugural wire cutters ($10–$20), and a Voltage Tester ($20–$40) are just to invest once. In the DIY system, labor is saved with an hourly charge of $50–$150 if hired. Smart switches could cost $30–$100 each, thus increasing spending. In the case of local codes, the budget for permissions, as a rule, is $20–$100. With sufficient price comparison and the use of energy-saving equipment, both the cost and the quality could be maintained at the desired level.
Obviously, the rise of smart technology is shifting the evolution of light switches. Wi-Fi and Bluetooth 2-way switches give an additional option of controlling and scheduling via smartphones using apps from any location. A combination of such switches with home automation systems such as SmartThings or Home Kit enables voice-activated lighting for convenience. The switches for energy monitoring not only keep a record of energy use with them but also help in saving energy. Touch-sensitive and motion−sensor switches are designed in such a way that manual operation is decreased and suit families with a variety of schedules as well. The bar of LED lights is seeing the increase, the more demand switches with such functions as dimming and color-changing are getting. Keeping in touch with trends will lead to future-ready and avant-garde wiring projects in your home.
Installing a two-way light switch is a project that has great benefits for your residence – convenience, safety, and value. From understanding the basics to troubleshooting issues, this guide offers extensive assistance on how to complete the task efficiently. There are step-by-step instructions and advanced tips available for you, no matter if you are installing a new staircase or modernizing a whole room. Take control of your lighting with reliable and safe materials, and comply with all the necessary regulations. If the installation is rather complex or you are uncertain, then contact a professional electrician at your earliest convenience. Use your skills to reform the space and make your house the epitome of a smart, energy-efficient lighting environment.
Disclaimer: The views and opinions expressed by individual authors or forum participants on this website do not represent the views and opinions of Chipsmall, nor do they represent Chipsmall's official policy.

share this blog to:
Chipsmall will provide you real-time product updates, limited-time deals.


Copyright © 2004-2026 Chipsmall.com All Rights Reserved.

Feedback
We appreciate your engagement with Chipsmall's products and services. Your opinion matters to us! Kindly take a moment to complete the form below. Your valuable feedback ensures that we consistently deliver the exceptional service you deserve. Thank you for being part of our journey towards excellence.

